HTML ... Working with images
STEP 14
This is probably the information you have been looking forward to the most. How do we put pictures, logos, graphics and the like into our website to make it more interesting? Well, now that you have a good understanding of "hypertext" links, this part should come quite easily. (At least the "coding" part...) There are, basically, two main types of images that you can use in your websites. These are: .gif files - "Graphical Interchange Format" and
.jpg files - "Joint Photographic Experimental Group" (also known as .jpeg files) The MAIN DIFFERENCE between these two formats is the LEVEL (or number) of colours that you can use to display these image types. It gets a bit "complex" here and for the sake of simplicity: .gif files allow for 256 total colours and for "transparency" functions
These files are best suited for logos and are the ONLY format used for "animated graphics" and are generally SMALLER in SIZE than .jpg files. .jpg files allow for "millions of colours" and are best suited for displaying PHOTOS as the DISPLAY QUALITY is almost always superior to .gif files. These files are generally larger than .gif files and should be compressed carefully so they DO NOT TAKE FOREVER to download and display on your site. These files are CONSTANTLY ABUSED across the Internet where designers put very large files into their pages. REMEMBER: If a website does NOT LOAD within 10 seconds... most visitors will move on to the next site that does. You want to try to keep the FINAL SIZE of .jpg files smaller than 25K (kilobytes) in file size whenever possible. We will visit this technical information in the TIPS and TRICKS section of the tutorial at the end of the course. To insert a picture into your website, you will be using "image source tags". These tags take the form: <img src = "images/testpix.jpg"> or <img src = "images/testlogo.gif"> You ALWAYS WANT to save all of your images and logos (artwork) to your "artwork" folder inside the "basicweb" folder (or within each individual job folder) because when you start designing sites that are more complex, you will have dozens of image files - you can get easily confused if you don't save them in one logical place. Also, as you work on images (resizing, colourizing, animating, etc.) you will want to save these to the "builders" folder discussed earlier in the course. These images are saved in this folder to "remind" you that they have NOT be optimized (sized down) for use in the website (read: are FAST TO DOWNLOAD!). When you are saving .jpg files, you have options on the amount of COMPRESSION to use to size them down. For most websites, you will choose MINIMUM or slightly higher quality to keep the images small. If you don't keep a MASTER UNCOMPRESSED file in your builders folder and have to "edit" these images, you will LOSE SERIOUS QUALITY when you attempt to "resave" them to your "images" folder. This will take some getting used to for the novice (NON-PHOTOSHOP users). Don't worry too much about it and you can always "rescan" and "resize" photos if you make mistakes. NOTE: Online Graphics offers basic and advanced Photoshop courses too! Our courses are tailor made to editing images for web page design. Feel free to ask for more information by email at:
info@online-graphics.com. There are 3 test images inside the "images" folder in this tutorial called: testpix_min.jpg, testpix_max.jpg and testpix.gif that are being displayed below:

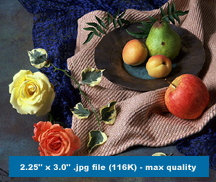

The image at the top left is a .jpg file saved with "maximum compression" generating "low" quality output while the image at the top right is the same image with "minimum compression" generating "highest" quality output. If you look at the type in the blue box and through certain parts of the image, you will see that the "low quality" .jpg file is a "lossy" image or is starting to "pixelize" especially in the highlight areas and midtones. The "highest" quality .jpg does NOT show this "loss". NOTE: All of the images above started out as 116K "raw scanned" high quality .jpg files.
So why use the "low" quality instead of the "high" quality file? The "low" quality .jpg file is ONLY 14K in size after compression (this is the approximate size of data that must be downloaded by your visitors in order to display this file in your browser) whereas the "higher" quality .jpg file is 65K after compression. Using a 56K modem (the current most popular speed) your visitors enjoy data downloads at approximately 2.5K per second. Therefore, the 14K image will take approximately 5.5 seconds to download and display fully whereas the 65K image of the same size will take over 20 seconds..! (These figures are just an approximation as depending on computer speed and network traffic these images may download more quickly or much slower!) REMEMBER: Your visitors need to be impressed within the first 10 seconds of their visit... or they may move on! Now, look at the .gif image. It looks very similar in quality to the image at the top right (maximum quality .jpg)... so you may be asking, why use .jpg images at all? Well, look VERY CAREFULLY in the midtones and the highlights of both images, and you WILL see some quality differences. The .gif image will ALWAYS appear to be more contrasty (not so smooth in the detail). This .gif file ends up being 30K in size and would take approximately 11 seconds to download using the 56K modem. What image format with what sort of compression is an ongoing discussion in webmasters' circles around the world. "What do our visitors REALLY want to see and what quality do they EXPECT or DEMAND?" There isn't a simple answer to this question, unfortunately, except to say that most visitors DEMAND fast downloading and smooth display attributes. If you are working on a website for a company that is selling HIGH QUALITY garments, you may want to consider using the .jpg file format with "medium" compression for their images whereas if you are working on a site for a company that simply wants pictures of their staff members displayed, you could choose either "high compression - low quality" .jpg files or simply use .gif files. If you remember from earlier is this session, we suggested you save your "master images" in the "builders" folder. The reason for this is if you have already saved a .jpg file with "low" quality and then have to reopen it to edit it, then you will lose serious image quality and resolution. Refer to the images below:
